SSL with free SSL certificate from AWS and acceleration with CDN
We will show you how to SSL-ize your website using your Name.com domain and a free certificate from AWS. The method we will show you uses Name.com instead of AWS’s Route53. If you have a multi-year contract for a domain, only the domain may not use AWS. You can continue to use Name.com without migration and use AWS Cloud Front and Certificate Manager to SSL-ize your website.
Free AWS Certificates
AWS can issue SSL certificates for free at the AWS Certificate Authority. They are also automatically renewed. On regular Linux servers, you can use Let’s Encrypt for free SSL certificates. If you are interested, please also read the following article.
![Run Windows software on Oracle’s free VPS [Part 1] | Algo-AI Infrastructur](https://algo-ai.work/wp-content/uploads/luxe-blogcard/4/464896efac4810ce1e02c1fd98300bb0.jpg)
AWS provides free certificates through AWS Certificate Manager (ACM).
AWS Certificate Manager is a service that makes it easy to obtain, manage, and use trusted SSL/TLS certificates on the Internet; ACM allows you to obtain various types of certificates, from creating self-signed certificates to signing certificates from public CAs.
In particular, AWS offers free certificates through Public Certificates in AWS Certificate Manager (ACM). Public Certificates automatically issues and manages Domain Validation (DV) SSL/TLS certificates, which are signed by an official CA to prove ownership of the domain.
SSL Certificate Creation
Access Certificate Manager.
Send a request to obtain an AWS signed certificate.
The certificate will not be issued until the validity of the domain is proven.
Request a public certificate. The fully qualified domain name is the domain you plan to use. In this case, it is the domain used by Name.com. Leave the other defaults as they are and click Request.
If you look at the status of the certificate after the request, you will see that the status is pending and the CNAME name and CNAME value are listed. To prove that you have the domain, register this information as a cname record at name.com to prove that you own the domain. When the proof is complete, the message “Success" will be displayed.
Setting up cname in your dns
Set cname in dns to prove that you own the domain in AWS.
Configure CNAME settings in DNS.
Here is an example of using お名前.com.
A CNAME record is a mechanism that allows you to tie a formal name to an alias. It is interesting that you use this mechanism to indicate that you hold a certificate.
Go to お名前.com and from the Domains tab, click on “Domain DNS Settings".
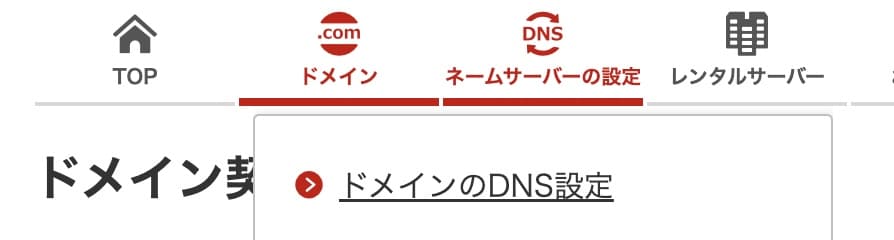
Click the “Configure" button under Use DNS record settings.

Add a CNAME record: select “CNAME" for TYPE, enter “CNAME Name" for the hostname, and enter “CNAME Value" for the VALUE. Click the ADD button to confirm and configure.

After registration is complete and a short while later, the AWS side request is completed and the certificate is issued.
Select a certificate in Cloud Front and publish it on the web
Set the created certificate to Cloud Front.
Create a distribution and select the origin domain where the published web server information is located.
Set an alternate domain name (CNAME) to use your お名前.com domain. Use the same name as the certificate.
Select an SSL certificate. You can use a certificate that has been requested and created.
Cloud Front should be able to publish the web server. If you can wait a few minutes, copy the distribution domain name and access it with the URL in another tab of your browser, you have succeeded.
Conclusion
We have shown you how to convert your website to SSL using a DNS Service domain and an SSL certificate. The certificate is free of charge and can be renewed automatically. In addition, by using Cloud Front, we were able to improve security with AWS Shield and speed up the process with CDN.
Follow us on Twitter if you like.